So following on from my previous post about switches, let’s talk about Passive Infra Red (PIR) sensors.
Loxone Presence Sensor
Cost: OMG HOW MUCH?!
Summary: No way in hell I’m buying one at that price
Supplier: Loxone
Wow, the price of this is staggering. It’s got a light level sensor and a PIR in it. I’m not going to buy one, but I’m including it here without much comment.
Manufacturers site – http://shop.loxone.com/enuk/presence-sensor.html
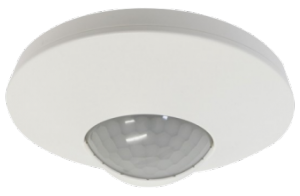
Generic presence sensor
Cost: Low (£10)
Summary: Not quite what I’m after, but I can hack this.
Supplier: Low Energy Supermarket Ebay shop
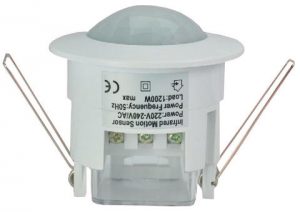
I purchased this with the thought that I would place them in some rooms outside of the automation system like the toilet and possibly the kitchen. I ran it in the kitchen for a while until it finally started to annoy me. There’s an adjustable timer and light level sensor which means that once the light drops below a certain level the PIR will activate the light until no presence is detected and the timer runs down. It’s 240v mains, which isn’t great for working with, so having gotten annoyed with it and removed it (Claire nearly cut herself after the lights in the kitchen went out) I took it apart for a looksee.
So what’s the black tube? It’s a fuse, that’s a good thing. Otherwise not much of interest.
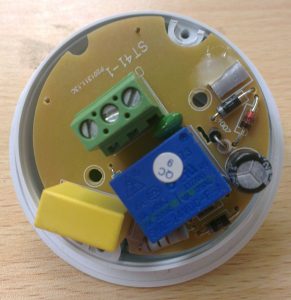
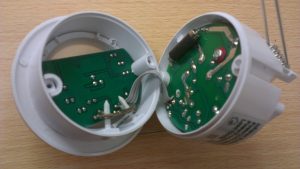
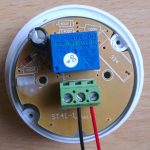
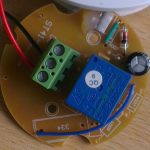
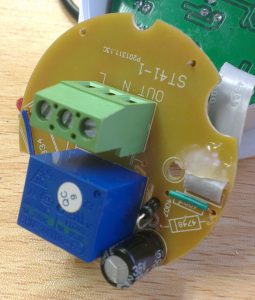
Oh hello! That’s a 24v relay. That means that we’re looking at a 24v DC supply. *grin* The Loxone kit is 24v DC, which I don’t think I’ve mentioned so far. The two circuit boards are a mains power supply and the combined PIR and logic board with the two variable resistors on. Removing or modifying the back board *should* give us a board that we can power with 24v and will trigger a 24v line when activity and suitable light level are detected. We don’t actually care about the light level or the timer so we can turn both right down. Now we have something we can connect directly to a Loxone digital input and feed into a lighting controller block for a fraction of the cost of the official presence sensor. This I like 🙂
Purchased from Low Energy Supermarket Ebay Shop –http://www.ebay.co.uk/itm/230776895665
Hacking the generic PIR
Some time after writing the top half of this post, I got to the testing. Tests on the generic PIR revealed that indeed it was 24v as expected. A simple full wave rectification circuit with four 1N4007 diodes, a couple of capacitors, a signal diode and a couple of resistors.
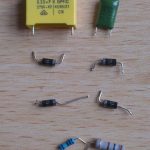
Turns out the signal diode was mostly redundant as far as I can tell, it’s included to eliminate back EMF but that’s actually dealt with by one of the power diodes without need for it. Eh, I put one of the power diodes back in and removed the signal diode.
So testing! Lets see what the current consumption is like on this after the modification
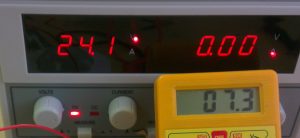
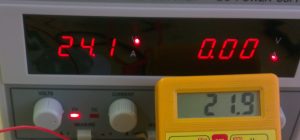
Huzzah! 24v DC PIR with low current consumption and low cost. Our terminals are now switched 24v DC, 0v and +24v DC enabling us to use this on an input as suggested above. The input can then be mapped to the sensor input on the lighting controller and programming via the Loxone as documented.
I’m very happy with this money saving hack and will be buying a few more of these sensors in the very near future!
Ian, we have just installed a Loxone system into a new house we have constructed. We are at the stage were we need to install the presence sensors. Having read the Trulysmart post on the options available and the cost, I was wondering how your experience has been with these sensors after you have made the changes. How sensitive are they, how noisy are the contacts etc. I see your original post was April 15 and this will have hopefully given you the chance to see the sensor in all situations
Hi Phillip,
Have to confess that whilst I’ve done the hacks to make the sensors work, we’ve not yet got them in place so I can’t say how well they will work in terms of sensitivity etc.
In terms of noise, there is a relay however the logic on the board is such that it shorts a floating 24v line to ground when presence is detected, in theory the relay could be removed and the logic line taken straight to an input meaning that there would be no sound at all. YMMV and you’d need to do some testing to make sure that there were no issues before wiring that up you your controller.
My approach is to turn down timing and light sensitivity to the minimal and then use timing on the controller.
Hope that helps, Ian.
An old post, but very usefull for me. I’ve ordered a simular PIR which has a newer ST41-2 version, but still uses the 24v relay (I’ve measured ~21 V on the output side).
I’m not an electronics expert, but wonder why you let the capacitor in the top board. From what I’ve understand this has to be combined with a resistor because to deal with a short short circuit situation when powering up (I’ve gotten this wisdom from this artical: https://www.homemade-circuits.com/cheap-yet-useful-transformerless-power/ under the “1) Basic Transformerless Design” section). I’m not trying to correct you or anything, I just want to understand it so I can implement your solution. I hope you can clarify this.
ps. If your interested I can send pictures of the new board. Basically the moved partly to SMD components and I think the zener diode is moved to the lower board.
Greetings Jeffrey